前后端分离项目中, JWT算是比较流行的基于登录策略的解决方案, 下面就在SpringSecurity中整合JWT在一起使用, 实现前后端分离时登录解决方案
无状态登录
有状态
有状态服务, 即是服务端需要记录每次会话的客户端信息, 从而识别客户端身份, 根据用户身份进行请求的处理, 典型的设计比如Tomcat中的Session.
例如登录:用户登录之后, 我们将用户的信息保存在服务端session中, 并且给用户返回一个cookie值, 记录对应的session, 然后在下一次请求时,
用户携带cookie值进行访问(浏览器自动完成携带), 我们就会识别到对应的session, 从而找到用户的信息.
这种方法使用方便, 但也有对应的缺点, 如下:
1. 服务端保存了大量的数据, 增加了服务端压力
2. 服务端保存了用户状态, 不支持集群化部署
无状态
微服务集群中的每个服务, 对外提供的都使用RESTful风格的接口. 而RESTful风格的一个最重要的规范便是:服务的无状态性, 也就是:
1. 服务端不保存任何客户端请求者的信息
2. 客户端的每次请求必须要具备自描述信息, 通过这些信息来识别客户端身份
无状态性的好处:
1. 客户端请求不依赖服务端的信息, 多次请求不用一定要访问到同一台服务器
2. 服务端的集群和状态对客户端透明
3. 服务端可以任意的迁移和伸缩, 可以更方便的进行集群化部署
4. 减少了服务端的存储压力
如何实现无状态
无状态登录流程:
1. 首先客户端发送账户名/密码到服务端进行验证
2. 认证通过之后, 服务端将用户信息加密并且编码成一个token, 返回至客户端
3. 以后每一次客户端进行发送请求, 都需要携带上认证的token
4. 服务端对客户端按发送过来的token进行解密, 判断是否有效后, 获取用户登录信息
JWT
JWT简介
JWT, 全称为Json Web Token, 是一种JSON风格的轻量级授权和身份认证规范, 可以实现无状态、分布式的Web应用授权:
JWT作为一种规范, 并没有和其他语言绑定, 常用的java实现是开源jjwt, GitHub地址:https://github.com/jwtk/jjwt
JWT数据格式
JWT包含了三部分数据:
- Header: 头部, 通常头部有两部分信息:
- Payload: 载荷, 就是有效数据, 在官方文档中(RFC7519), 有7个实例信息:
- iss(isser): 表示签发人
- exp(epiration time): 表示token过期时间
- sub(subject): 主题
- aud(audience): 受众
- nbf(Not Before): 生效时间
- iat(Issued At): 签发时间
- jti(JWT ID): 编号
这一部分也会采用Base64Url编码, 得到第二部分数据.
- Signature: 签名, 是整个数据的认证信息, 一般根据前两步的数据,
再添加上服务的密钥secret(密钥保存在服务端内, 不能泄露给客户端),
通过Header中配置的加密算法生成. 用于验证整个数据的完整性和可靠性.
eyJhbGciOiJIUzUxMiJ9.eyJhdXRob3JpdGllcyI6IlJPTEVfdXNlciwiLCJzdWIiOiJzaWhhaSIsImV4cCI6MTY2ODc0NDg0N30.iHJGpI8ySVWgXoFr6NSc0V9NRDZIo0RkGIwOUsTxszif9ClT-ZSweImdiMpRfNlHtFFxO7sCiLEZN1zlCjXKtQ
生成的数据结构会通过.隔开成三个部分, 分别对应上方的三部分,
另外需要注意的是, 这里的数据是不换行的
JWT交互教程
流程图:
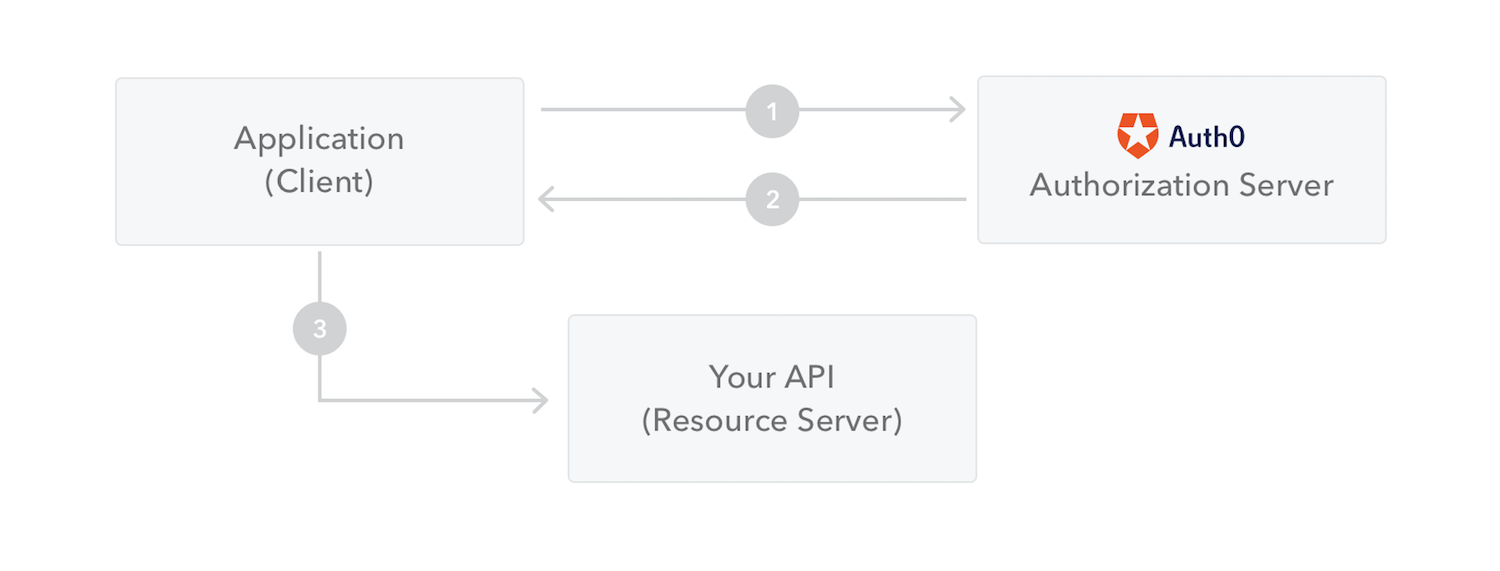
步骤:
1. 应用程序或者客户端向授权服务器请求授权
2. 获取到授权之后, 授权服务器会向应用程序返回访问令牌
3. 应用程序使用访问令牌来访问受保护的资源 (例如:API)
因为JWT签发的token中已经包含了用户的身份信息, 并且每一次请求都会携带上,
这样服务就不需要保存用户信息, 甚至不需要到数据库中查询, 这样便完全符合了RESTful的无状态规范
JWT缺点
JWT也不是天衣无缝, 由于客户端维护登录状态带来的问题依然存在, 例如:
1. 续签问题: 这也是被很多人诟病的问题之一, 传统的cookie+session的方案天然的支持续签, 但是jwt由于服务端上不保存用户状态
因此很难完美解决续签问题, 如果引入redis缓存, 虽然可以解决问题, 但是jwt也变的不纯粹了
2. 注销问题: 由于服务端不再保存用户信息, 所以一般可以通过修改secret来实现注销, 服务端的secret修改之后, 已经颁发的未过期的token就会认证失败, 进而实现注销, 不过没有传统的注销方便
3. 密码重置: 密码重置之后, 原本的token依旧可以访问系统, 这个时候也需要强制修改secret
4. 基于注销问题和密码重置, 一般建议不同的用户取不同的secret
整合实现
环境搭建
首先创建一个Spring Boot项目, 创建时候需要添加Spring Security依赖, 创建后添加jjwt依赖, 完整的 pom.xml 如下:
1
2
3
4
5
6
7
8
9
10
11
12
13
| <dependency>
<groupId>org.springframework.boot</groupId>
<artifactId>spring-boot-starter-security</artifactId>
</dependency>
<dependency>
<groupId>org.springframework.boot</groupId>
<artifactId>spring-boot-starter-web</artifactId>
</dependency>
<dependency>
<groupId>io.jsonwebtoken</groupId>
<artifactId>jjwt</artifactId>
<version>0.9.1</version>
</dependency>
|
然后在项目中创建简单的User对象并且实现UserDetails接口, 如下:
1
2
3
4
5
6
7
8
9
10
11
12
13
14
15
16
17
18
19
20
21
22
23
24
25
26
27
28
29
30
31
32
33
34
35
36
37
38
39
40
41
42
43
44
45
46
47
48
49
50
51
52
| public class User implements UserDetails {
private String username;
private String password;
private List<GrantedAuthority> authorities;
@Override
public boolean isAccountNonExpired() {
return true;
}
@Override
public boolean isAccountNonLocked() {
return true;
}
@Override
public boolean isCredentialsNonExpired() {
return true;
}
@Override
public boolean isEnabled() {
return true;
}
@Override
public Collection<? extends GrantedAuthority> getAuthorities() {
return authorities;
}
@Override
public String getPassword() {
return password;
}
@Override
public String getUsername() {
return username;
}
public void setUsername(String username) {
this.username = username;
}
public void setPassword(String password) {
this.password = password;
}
public void setAuthorities(List<GrantedAuthority> authorities) {
this.authorities = authorities;
}
}
|
再创建一个HelloController, 如下:
1
2
3
4
5
6
7
8
9
10
11
12
13
| @RestController
public class HelloController {
@GetMapping("/hello")
public String hello() {
return "hello jwt !";
}
@GetMapping("/admin")
public String admin() {
return "hello admin !";
}
}
|
上面的HelloController很简单, 两个接口, /hello接口可以被具有 user 角色的用户访问,而 /admin 接口则可以被具有 admin 角色的用户访问。
JWT过滤器配置
首先提供两个和JWT相关的过滤器配置:
- 第一个是用户登录的过滤器, 在用户登录的过滤器中校验用户是否登录成功, 如果登录成功, 则会生成一个token返回给客户端, 登录失败则给前端返回一个登录失败的提示.
- 第二个过滤器则是当其他请求发送过来时, 校验token是否有效的过滤器, 如果校验成功, 则让请求继续执行.
用户登录过滤器 JwtLoginFilter
1
2
3
4
5
6
7
8
9
10
11
12
13
14
15
16
17
18
19
20
21
22
23
24
25
26
27
28
29
30
31
32
33
34
35
36
37
38
39
40
41
42
43
44
45
46
47
48
49
50
51
52
53
54
55
56
57
58
59
60
61
62
| public class JwtLoginFilter extends AbstractAuthenticationProcessingFilter {
public JwtLoginFilter(String defaultFilterProcessesUrl, AuthenticationManager authenticationManager) {
super(new AntPathRequestMatcher(defaultFilterProcessesUrl));
setAuthenticationManager(authenticationManager);
}
@Override
public Authentication attemptAuthentication(HttpServletRequest request, HttpServletResponse response) throws AuthenticationException, IOException, ServletException {
User user = new ObjectMapper().readValue(request.getInputStream(), User.class);
return getAuthenticationManager().authenticate(new UsernamePasswordAuthenticationToken(user.getUsername(), user.getPassword()));
}
@Override
protected void successfulAuthentication(HttpServletRequest request, HttpServletResponse response, FilterChain chain, Authentication authResult) throws IOException, ServletException {
Collection<? extends GrantedAuthority> authorities = authResult.getAuthorities();
StringBuffer stringBuffer = new StringBuffer();
for (GrantedAuthority authority : authorities) {
stringBuffer.append(authority.getAuthority()).append(",");
}
String jwt = Jwts.builder()
.claim("authorities", stringBuffer)
.setSubject(authResult.getName())
.setExpiration(new Date(System.currentTimeMillis() + 60*60*1000))
.signWith(SignatureAlgorithm.HS512, "sihai@123")
.compact();
Map<String, String> map = new HashMap<>();
map.put("token", jwt);
map.put("msg", "登录成功!");
response.setContentType("application/json;charset=utf-8");
PrintWriter out = response.getWriter();
out.write(new ObjectMapper().writeValueAsString(map));
out.flush();
out.close();
}
@Override
protected void unsuccessfulAuthentication(HttpServletRequest request, HttpServletResponse response, AuthenticationException failed) throws IOException, ServletException {
Map<String, String> map = new HashMap<>();
map.put("msg", "登录失败!");
response.setContentType("application/json;charset=utf-8");
PrintWriter out = response.getWriter();
out.write(new ObjectMapper().writeValueAsString(map));
out.flush();
out.close();
}
}
|
JwtLoginFilter这个类有三点需要注意:
- 自定义JwtLoginFilter类继承自 AbstractAuthenticationProcessingFilter类, 并且实现其中的三个默认方法
- attemptAuthentication方法中, 从登录参数中提取出用户名密码, 然后调用AuthenticationManager.authenticate()方法进行自动校验
- 如果第二步校验成功, 就会进入successfulAuthentication回调中, 在successfulAuthentication方法中, 将用户角色遍历之后用
,连接起来, 然后再利用Jwts生成token, 按照代码顺序, 生成的过程中一共配置了四个参数, 分别为用户角色、主题、过期时间、以及加密算法和密钥, 最后将生成的token写出到客户端
- 如果第二部校验失败, 就会进入unsuccessfulAuthentication方法中, 在这个方法中只需要返回一个错误提示给客户端即可
用户登录过滤器 JwtFilter
第二个token校验过滤器
1
2
3
4
5
6
7
8
9
10
11
12
13
14
15
16
17
18
19
20
21
| public class JwtFilter extends GenericFilterBean {
@Override
public void doFilter(ServletRequest servletRequest, ServletResponse servletResponse, FilterChain filterChain) throws IOException, ServletException {
HttpServletRequest req = (HttpServletRequest) servletRequest;
String jwtToken = req.getHeader("authorization");
Jws<Claims> jws = Jwts.parser().setSigningKey("sihai@123")
.parseClaimsJws(jwtToken.replace("Bearer", ""));
Claims claims = jws.getBody();
String username = claims.getSubject();
List<GrantedAuthority> authorities = AuthorityUtils.commaSeparatedStringToAuthorityList(((String) claims.get("authorities")));
UsernamePasswordAuthenticationToken token = new UsernamePasswordAuthenticationToken(username, null, authorities);
SecurityContextHolder.getContext().setAuthentication(token);
filterChain.doFilter(servletRequest, servletResponse);
}
}
|
JwtFilter这个类有两点需要注意:
- 首先从请求头中提取出anthorization字段, 这个字段对应的value为用户的token
- 第二, 将提取出来的token字符串转换为一个Claims对象, 再从Claims对象中提取出当前用户名和用户角色, 创建一个UsernamePasswordAuthenticationToken放到当前的Context中, 然后执行过滤链使请求继续执行下去
Spring Security配置
1
2
3
4
5
6
7
8
9
10
11
12
13
14
15
16
17
18
19
20
21
22
23
24
25
26
27
28
29
30
31
32
33
34
35
| @Configuration
public class SecurityConfig extends WebSecurityConfigurerAdapter {
@Bean
PasswordEncoder passwordEncoder() {
return new BCryptPasswordEncoder();
}
@Override
protected void configure(AuthenticationManagerBuilder auth) throws Exception {
auth.inMemoryAuthentication()
.withUser("sihai")
.password("$2a$10$Zph4wvfYiLJ58zQxPialb.eOu.ChlV6/roabVTTbQCmCrEv9Z45gy")
.roles("user")
.and()
.withUser("admin")
.password("$2a$10$Zph4wvfYiLJ58zQxPialb.eOu.ChlV6/roabVTTbQCmCrEv9Z45gy")
.roles("admin");
}
@Override
protected void configure(HttpSecurity http) throws Exception {
http.authorizeRequests()
.antMatchers("/hello")
.hasRole("user")
.antMatchers("/admin")
.hasRole("admin")
.antMatchers(HttpMethod.POST, "/login")
.permitAll()
.anyRequest().authenticated()
.and()
.addFilterBefore(new JwtLoginFilter("/login", authenticationManager()), UsernamePasswordAuthenticationFilter.class)
.addFilterBefore(new JwtFilter(), UsernamePasswordAuthenticationFilter.class)
.csrf().disable();
}
}
|
- 如果不想对密码进行加密, 可以在passwordEncoder()中配置NoOpPasswordEncoder.getInstance()无操作密码编译器实例
- 上面并未采取连接数据库, 而是直接在内存中配置了两个用户, 两个用户分别具备user、admin两个角色
- 配置路径规则时,
/hello接口必须要具备user角色才可以访问, /admin接口必须要具备admin角色才可以访问, POST请求并且是/login接口则可以直接通过, 访问其他接口必须要认证后才可访问
- 最后添加上两个自定义的过滤器并且关闭掉csrf保护